
However, repairing or replacing your roof is not your typical DIY project. While there are certain roofing issues you can tackle yourself, which also includes patching holes. Yes, fortunately, repairing a hole in the wall is a manageable DIY project that can restore your wall and bring back its original look. If you know how to repair hole in wall you can save a lot of time and money involved in hiring a professional. So, in this guide, you will explore different ways to repair a hole in the wall, whether it is a small nail hole, a medium-sized dent, or a large gaping hole. Once you master these techniques, you can handle multiple wall damages.
There are plenty of reasons that cause a small hole in drywall. Everyday activities can result in minor damage and may compromise the wall’s integrity if left unaddressed.
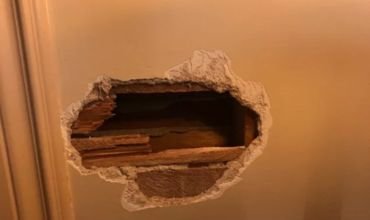
Talking about larger holes, can be caused by more significant impacts or structural issues. Here are some common causes:
Whether you are patching a small hole or a large gap, you will need the following tools and equipment to make sure your repair process goes smoothly:
Patching Large Holes
Materials Needed
Patching Small Holes
Patching Large Holes
To patch small holes in drywall, you will need a patch kit. The kit contains a self-adhesive patch that sticks to the drywall and covers the hole. These patches are easy to apply; however, since they sit on top of the drywall, the repaired area will be slightly raised once the repair is finished.
Here is the step-by-step guide you can perform to patch holes in drywall:
Step 1: Before you apply the patch over the hole, you must make sure that the edges of the hole are smooth and free from debris. An uncleaned wall can prevent the patch from adhering properly and will lead to less effective repair and uneven finish. Consider using sandpaper or a putty knife to scrape the edge around the hole so that the patch adheres well.
Step 2: You can now apply the patch over the hole and press it onto the drywall with ease. Check whether it is properly attached to the surface.
Step 3: For small holes, spackle can be used effectively. Apply a small amount of spackle to the hole with a putty knife. If required, apply a second layer, then smooth the spackle with a putty knife, ensuring it blends properly with the wall.
Step 4: After applying the spackle, leave it to dry completely, following the drying time specified on the product. Usually, spackle takes two to three hours to dry. Do not try to paint the areas until the spackle has dried. Otherwise, the paint won’t bond to the surface, and you will end up with a messy finish.
Step 5: Before painting the patched area, apply a coat of primer. This will help the paint blend easily with the rest of the wall, providing an even and professional finish.
Step 6: As soon as you notice the primer is completely dry, paint the patched area to match the rest of the wall. Also you might also need to apply multiple coats to get a perfect match.
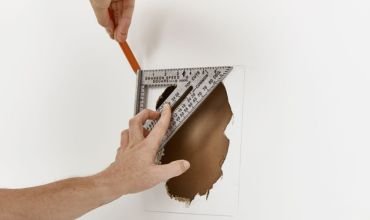
For larger holes, drywall patches are a reliable solution. As the damage or hole is large, a small patch kit cannot repair the entire hole. So, you will first measure the hole and cut a piece of drywall accordingly to fill the hole.
Step 1: First, remove debris or any damaged drywall around the hole to make sure the surface is all clean before the process starts.
Step 2: With a tape measure, measure the hole, then use a utility knife to cut a piece of drywall. Make sure the drywall patch is larger than the hole.
Step 3: Drywall holes are never well-shaped, so make sure the patch is larger than the hole. You can use a drywall saw to make clean and straight cuts.
Step 4: To support the drywall patch, place furring strips behind the hole. Secure them to the surrounding drywall with screws. These strips are used for a stable backing for the patch, ensuring that it stays firmly in place.
Step 5: Now, you can place the drywall patch into the hole and secure it to the furring strips with screws. If you have cut the hole to the same size as the drywall patch, it should fit perfectly. Make sure the patch is flush with the surrounding wall to give a smooth finish.
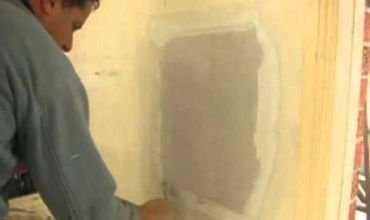
Step 6: To strengthen the repair and prevent future cracks, you will use joint tape on the borders of the patch. With a putty knife, you will cover the entire patch and joint tape with a joint compound. Consider applying a second layer if you notice unevenness or if the patch is still visible.
Step 7: Let the joint compound dry completely, following the drying time mentioned in the product. Generally, it will take about 24 to 48 hours before the joint compound is fully dry.
Step 8: Once dry, smooth the joint compound with sandpaper or a sanding block to blend the repair with the wall.
Step 9: To prepare the area for painting, apply a coat of primer to the patched area. This way, you can ensure the paint adheres properly and achieves a perfect finish.
Step 10: After the primer is dry and ready for paint, apply the paint to the patched area. Use a brush or roller to start with an even coat. You may have to apply multiple coats to ensure that the patched area blends perfectly with the rest of the wall.
Techniques used in repairing holes in drywall and plaster walls vary significantly due to differences in materials and construction methods. Drywall repairs involve a much simpler process than plaster repairs.
For Plaster Wall Repairs:
Hopefully, you now have a clear solution to “how to repair a big hole in the wall.” Once you patiently follow the necessary steps, gather all the required materials, and carefully execute the repair process, you can restore your wall to its original state. Just make sure you do not skip any of the steps or rush during the ongoing process. Any carelessness can compromise the quality of the repair. Also, invest in high-quality materials recommended by professionals to ensure the best results.
You can repair a hole in a wall by cleaning the area, filling it with spackle or joint compound, and smoothing it out. After that, you can leave the area to dry, sand it smooth, and paint it to match the rest of the wall.
Common causes of holes in walls include sudden impacts from furniture or door handles or accidental damages from activities like moving or kids playing. Also nails and screws can also create holes.
To fix holes in walls, you’ll need a putty knife, sandpaper, spackle or joint compound, a drywall patch kit (for larger holes), primer, and paint.
Yes, absolutely; you can fix large gap holes in your wall on your own using a drywall patch kit and joint compound. But you must be very careful and patient while performing the process.
The approximate cost to repair a hole in a wall can vary based on factors such as the size of the hole, the materials used, and whether you choose to do it yourself or hire a professional.
Repairing small holes in the wall won’t take much of your time and is quite simple. Clean the area around the hole, fill it with a joint compound, and level the surface.
No, you can’t paint over a patched hole just after applying the patch. It is important first to allow the joint compound to dry completely and then apply the primer.
To repair nail holes in a wall, you will fill the hole with a spackle with the help of a putty knife. Once dry, sand the surface and paint the area to match the color of the wall.
To repair holes in plaster walls, first clean the area and apply plaster patching compound over plaster tape. Leave it to dry, sand smooth, prime, and paint.


Leave a Reply