Roof leaks around chimneys are a story of almost every homeowner at some point. These leaks, if left unaddressed, can lead to serious structural issues and costly repairs. But relax, this was just a common maintenance challenge, and with the right approach, it can be effectively tackled. At ManageMyRoof, you can find comprehensive guidance on identifying the causes of chimney leaks and how to fix a leaky roof around a chimney effectively.
Notable Signs Of Chimney Leaking Problems
You cannot detect chimney leaking problems merely by visual inspection, as some issues may be hidden. However, there are warning signs you can watch for to identify a potential leaky chimney. Here are some common indicators to be mindful of:
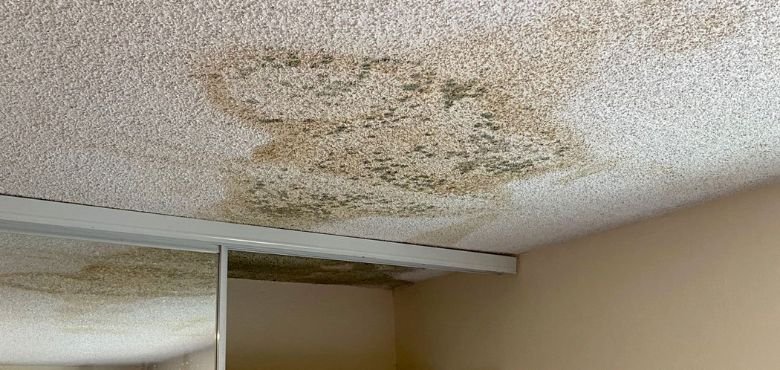
- Water Stains: Look for discoloration or stains on walls, ceilings, or around the chimney area.
- Peeling Paint or Wallpaper: Moisture can cause damage to the surfaces near the chimney.
- Musty Odor: A damp smell often indicates trapped moisture or water intrusion.
- Rust: Check for rust on the damper, fireplace doors, or other metal components.
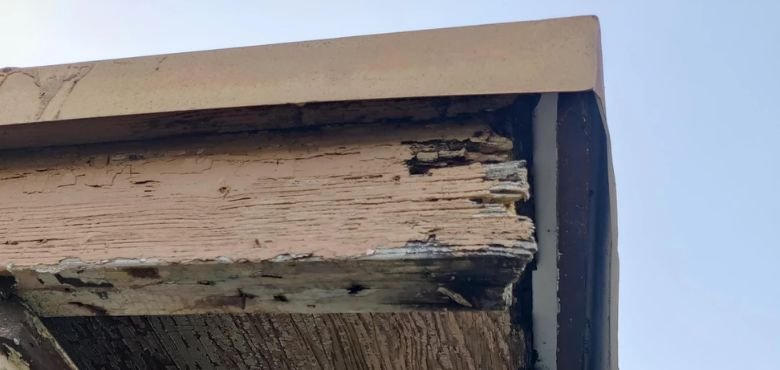
- Crumbling Bricks or Mortar: Water damage can weaken the masonry, causing bricks or mortar to deteriorate.
- Mold Growth: The Presence of mold around the chimney area is a clear sign of excessive moisture.
- Dripping Sounds: Hearing dripping water during rain could mean leakage inside the chimney.
- Visible Water Inside: Look for water accumulation in the firebox or other areas of the chimney.
Common Causes of Roof Leaks Around Chimneys
Now that you know what signs can indicate a leak, it’s essential to understand the potential causes.
- Damaged Flashing: Flashing is a vital barrier that prevents water from seeping between the chimney and the roof. Over time, flashing can crack, corrode, or become loose due to weather exposure, poor installation, or aging materials. Any damage to flashing compromises its ability to keep water out, resulting in leaks.
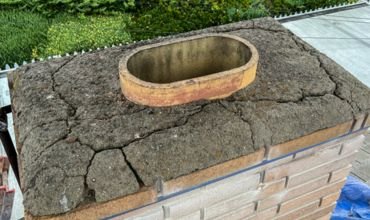
- Cracks in the Chimney Crown: The chimney crown, which sits atop the chimney, is a protective layer against rain and snow. When cracks form in the crown due to freezing and thawing cycles or general wear and tear, moisture can easily infiltrate, leading to leaks that affect the roof and surrounding areas.
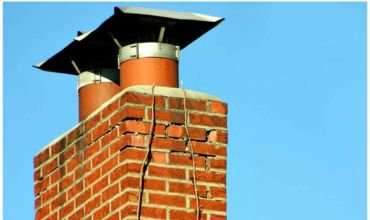
- Worn-Out Mortar Joints: Mortar joints hold the bricks or stones of the chimney together. With time, these joints can deteriorate or erode due to exposure to rain, wind, and temperature fluctuations. Damaged mortar joints create gaps that allow water to penetrate, causing leaks and structural instability.
- Inadequate Waterproofing: Chimneys need proper sealing or waterproofing to prevent water from entering the structure. Without an effective waterproof coating, porous materials like bricks or stones can absorb water, leading to leaks that affect the surrounding roof and interior spaces.
- Clogged Gutters: Gutters play a key role in channeling rainwater away from the roof. When gutters are clogged with debris, water can pool around the base of the chimney, increasing the likelihood of leaks and water damage. Regular cleaning of gutters is essential to prevent this issue.
- Extreme Weather Conditions: Intense rain, snow, or high winds can exacerbate existing vulnerabilities in the chimney or roof. For example, strong winds can lift flashing, while heavy snowfall can put extra pressure on the roof and chimney crown, leading to cracks or damage.
Tools and Materials Required To Fix a Leaky Roof Around a Chimney
If you think the repair is not something you can handle on your own, it’s best to consult a professional. However, if you’re ready to take on the task, here’s what you’ll need for leaky chimney repair:
Tools:
- Sturdy ladder for safe roof access
- Putty knife or trowel for applying sealants or mortar
- Caulking gun for waterproofing application
- Wire brush to clean debris from the chimney surface
- Pry bar to remove old or damaged flashing
- Safety gear, including gloves, goggles, and a harness
Materials:
- Roofing cement for sealing gaps
- Waterproof sealant to protect against moisture
- Replacement flashing to fix or replace damaged sections
- Masonry sealer for protecting brick or mortar surfaces
- Fresh mortar mix for repairing worn-out joints
- A chimney cap to prevent water and debris from entering
Detailed Steps to Fix a Leaky Roof Around a Chimney
Fixing a leaky roof around a chimney will no longer be challenging if you follow these straightforward steps:
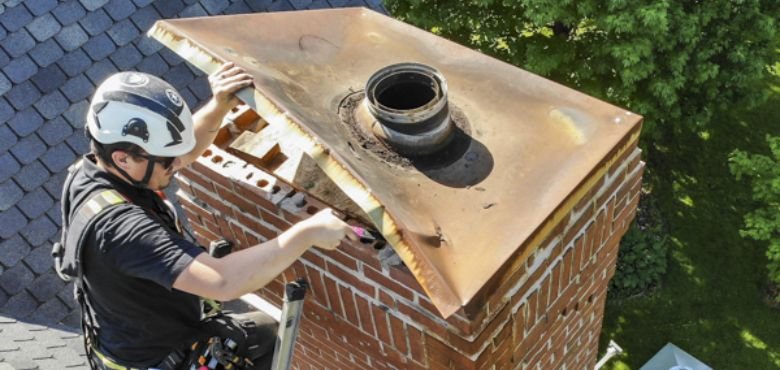
Step 1: Identify the Source of the Leak
Begin by inspecting the area around the chimney. Look for cracks in the flashing, crown, or mortar joints. Pay attention to rust, water stains, or peeling paint. If the exact source is unclear, running water over the chimney with a hose can help identify the problem.
Step 2: Repair or Replace Flashing
Flashing is the most common culprit in chimney leaks. If the flashing is loose or damaged:
- Remove the old, damaged flashing carefully using a putty knife or pry bar.
- Apply roofing cement to seal gaps around the chimney.
- Replace the flashing with new pieces, securing them tightly and sealing the edges with roofing cement for added protection.
Step 3: Seal Cracks in the Chimney Crown
For a cracked chimney crown:
- Clean the crown thoroughly using a wire brush to remove debris.
- Fill any cracks with a waterproof sealant or crown repair material.
- Apply a protective coating over the crown to prevent future damage.
Step 4: Repair Mortar Joints
If mortar joints are worn out:
- Use a trowel to remove the damaged mortar between the bricks.
- Mix fresh mortar and apply it to the gaps, smoothing it evenly.
- Allow the mortar to dry completely before exposing it to water.
Step 5: Waterproof the Chimney
Applying a waterproof coating can prevent leaks in the future:
- Clean the chimney exterior using a wire brush.
- Apply a masonry sealer or waterproof coating evenly across the chimney surface.
- Allow the coating to dry as per the product instructions.
Step 6: Check Gutters and Surrounding Areas
Ensure that your gutters are free from debris and effectively channel water away from the roof. Replace any broken or sagging sections of the gutter to prevent water buildup near the chimney.
When Is The Right Time To Call A Professional?
If you think fixing your roof on your own may be overwhelming or risky, it’s best to call a professional. Here are a few situations when you must consider hiring a professional roofer to ensure proper repair:
- If repairing the roof feels overwhelming or beyond your skills, consider calling a professional.
- Persistent leaks that don’t resolve after DIY repairs should be inspected by experts.
- Extensive damage to the chimney, flashing, or roof structure requires professional attention.
- Professionals have the tools, experience, and knowledge to ensure thorough and safe repairs.
- For structural issues or large-scale repairs, hiring a specialist can prevent further damage.
- It’s safer and often more cost-effective to rely on professionals when unsure about the repair process.
Taking Preventive Measures To Avoid Future Roof Leaks
You can try some you can try some practical steps to keep your roof and chimney in excellent condition and avoid leaks. Here is what you can try:
- Inspect the flashing regularly for any signs of rust, cracks, or looseness, and fix issues immediately.
- Clean gutters and downspouts frequently to ensure proper drainage and prevent water pooling.
- Apply a waterproof sealant or coating to the chimney to protect against moisture infiltration.
- Repair cracks in the chimney crown or mortar joints as soon as they appear.
- Install a chimney cap to keep out rain, snow, and debris.
- Schedule annual roof inspections by professionals to identify and address potential issues early.
- Trim overhanging tree branches to reduce debris buildup on the roof.
- Ensure proper attic ventilation to prevent moisture accumulation that can weaken the roof.
Summary
So, have you collected all the relevant information you needed about fixing a leaky roof around a chimney? Or, is there still something left unaddressed? If so, at ManageMyRoof, you can resolve any queries related to your chimney or roof repairs easily and professionally. From understanding repair processes and preventive measures to exploring whether professional assistance is required, ManageMyRoof provides expert advice tailored to your needs.
Help Desk
Q1. How to fix a leaky chimney? To fix leaky chimneys, identify the source of the leak by inspecting the flashing and other areas. Seal cracks, replace damaged flashing, or apply waterproofing to prevent future leaks.
Q2. How do I know if I have a leaky roof around chimney? You may notice water stains on ceilings or walls near the chimney, peeling paint, or a musty odor indicating moisture. Check for cracks, damaged flashing, or water dripping during rain.
Q3. What are the root causes of roof leaks around chimneys? Roof leaks around chimneys are often caused by damaged flashing, worn-out mortar joints, or cracks in the chimney crown.
Q4. How can I save my roof from leaking around the chimney? To save your roof from leaking, make sure you repair damaged flashing, seal cracks in the chimney, and apply a waterproof coating.
Q5. Can I Fix A Leaky Roof Around A Chimney on my own? Yes, you can fix minor leaks by sealing cracks, replacing damaged flashing, and applying waterproofing. For major repairs, contact a professional.
Q6. What tools and materials are needed to fix a leaky roof around a chimney? To fix a leaky roof, you will require cement, waterproof sealant, replacement flashing, a putty knife, and protective gloves. Additional tools like a ladder and caulking gun may also be necessary
Q7. Can weather conditions affect the repair of a chimney roof leak? Yes, repairs should ideally be done during dry weather to ensure proper adhesion and sealing of materials. Harsh weather can hinder the repair process.


Leave a Reply