To those looking for a money-saving and durable roofing solution, rolled roofing might be the perfect choice. This roofing material is popular for flat roofs, sheds, and other structures. It’s known for its ease of installation and long life, making it a great DIY for people. Now, you might be wondering, how do I install rolled roofing? Installing rolled roofing is very simple, but it requires careful preparation and focus on detail.
This blog post explains the step-by-step process of installing roofing rolls. From preparing the roof surface to sealing the edges, you will learn everything you need to complete this project successfully. As a budget-friendly and durable roofing option, rolled roofing is popular for homeowners looking to improve their property. Read on to get all the details thoroughly.

When selecting rolled roofing for your project, you must consider many factors to confirm the best possible performance and endurance. Have a look at the key factors to evaluate:
Asphalt is the most common and affordable rolled roofing material. It’s strong and comes in different types for different climates. Modified Bitumen is a better, more heat-resistant option. EPDM is rubber-based, great for harsh weather, and often used in big buildings. PVC is very strong against chemicals and the sun but can be more expensive.
You should consult with a roofing professional or refer to local building codes to determine the proper thickness of rolled roofing for your project. The thickness directly affects its durability and life. Thicker materials generally provide better protection against weather elements and foot traffic.
Fiberglass and polyester are common base materials for rolled roofing. Fiberglass bases are generally more stable and immune to tearing, while polyester bases offer better flexibility.
Consider the climate in your area and select rolled roofing accordingly. If you live in a region with extreme temperatures, heavy rainfall, or high winds, choose a material that fights these conditions. For example, EPDM or PVC are better suited for seaside areas with high humidity and salt exposure.

Consult with a roofing professional to determine if rolled roofing is suitable for your roof, especially if it has a more vertical slope.
You should set a budget before shopping to find the best-rolled roofing option that fits your needs and financial conditions. The cost of rolled roofing can vary depending on the material type, thickness, and brand.
A reputable manufacturer offers a warranty for its rolled roofing products. Before making your decision, consider the length and terms of the warranty.
Before knowing how to apply roll roofing, it’s important to prepare the roof surface properly to guarantee a secure and long-lasting application. Make sure to look at the steps below:

Having the right tools and materials is essential before starting your rolled roofing project. Ensuring you have all the necessary tools and materials before starting your project can avoid delays and ensure a smooth roll roofing installation process.
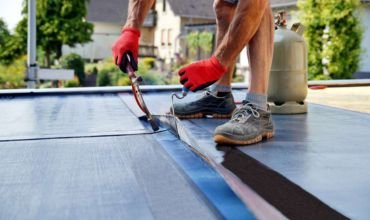
Use a utility knife to cut the rolled roofing material and felt. A roofing torch heats and seals the rolled roofing. Apply roofing cement or sealant with a roller. Measure and cut the roofing material accurately using a measuring tape—secure nails with a hammer. Remove any loose nails using a nail puller. Protect your eyes from scrap and hot materials with safety goggles. Wear work gloves to handle sharp tools and rough surfaces. Go to the roof safely with a ladder.
Choose the suitable type and thickness of rolled roofing material based on your roof’s needs and local climate. Using roofing felt as a base layer provides extra protection and improves bonding. Seal joints and secure the roofing material with roofing cement. Apply primer to enhance the sticking between the roofing material and the roof surface. Finally, flashing seals around chimneys, vents, and other penetrations.
Roofing felt is an important part of rolled roofing systems, providing a base layer that improves bonding and protects the roof surface. Here’s a step-by-step process on how to install roofing felt:
Prepare the roof surface by confirming it’s clean and free of garbage. Repair any damage before proceeding. If necessary, prime the surface to improve the bonding of the roofing felt. This will create a solid base for your rolled roofing project and guarantee a successful installation.

Start by unrolling the roofing felt onto the prepared roof surface. Start at the lowest point of the roof and work your way upward. Carefully lay the felt out evenly, ensuring no wrinkles or creases. This will provide a smooth and secure base for the rolled roofing material.
To provide proper coverage and waterproofing, the edges of the felt sheets should overlap by at least 6 inches. Use a utility knife to trim the edges and achieve the desired overlap. if necessary
Seal the overlaps by applying roofing cement or sealant to one side of the overlapping felt sheets. Press the two sheets together to create a secure seal. Allow the cement to dry completely before continuing with the next step.
Secure the felt to the roof surface by using roofing nails. Push the nails through the felt and into the sheathing. Confirm the nails got spaced around 6 inches apart for best support. This will help secure the felt and prevent it from shifting or coming loose.
Check the felt carefully for any gaps or holes. If you find any, immediately seal them with roofing cement. This will help prevent leaks and secure the integrity of your rolled roofing system. Pay close attention to areas where the felt overlaps, as these are particularly weak to gaps. Use a flashlight to inspect the felt from all angles, especially in low-light conditions. If you need more clarification about the condition of the felt, consult with a roofing professional for a thorough inspection.
Once you’ve finished laying the roofing felt and sealing its edges, you must allow it to dry completely before proceeding with the rolled roofing installation. This drying process guarantees that the cement used to secure the felt has fully cured, providing a strong and trustworthy base for the roofing material.

Rolled roofing installation can be dangerous, especially if you are working at a height. It’s very important to take all the safety safeguards to bypass harm. Check out some safety precautions to follow:
Follow the steps highlighted in this post to successfully install rolled roofing. Remember to prioritize safety, prepare the roof surface thoroughly, and use the right tools and materials. For expert assistance and guidance on rolled roofing installation and maintenance, consider consulting with Manage My Roof. It is a reputable company that can provide customized guidance and a high-quality job.
Roll roofing is a type of roofing material that comes in rolls and is used for flat roofs.
To install rolled roofing, prepare the roof, lay the felt, apply the roofing material, seal the edges, and secure with nails.
Yes, you can install a roll for roofing yourself.
You’ll need a roofing torch, utility knife, roller, measuring tape, hammer, roofing nails, roofing felt, rolled roofing material, roofing cement, and primer.
The installation time can take around a few days to complete.
Roll roofing can last for 10-15 years or more.
It can sometimes be used on steeper slopes with additional support and precautions.
Leave a Reply